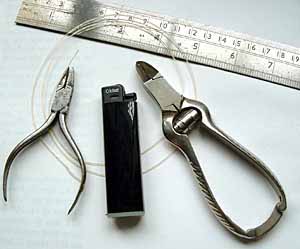
- Pliers, small.
- Lighter.
- Ruler.
- Nail clippers or small wire cutters.
- Fret position tables for the stringlength of your instrument.
You should also have fret gut in a range of diameters available. This will usually start around 1mm and end up around 0.5mm.
Frets should be tied with all the strings on and the instrument should be up to pitch.
The size of the first fret will usually be around 1mm on my instruments. The exact gauge used will be listed on the fret sheet that was supplied with the instrument. If you have not got a list of frets for your instrument, you can always measure an unworn part of the existing fret using a micrometer or vernier callipers.
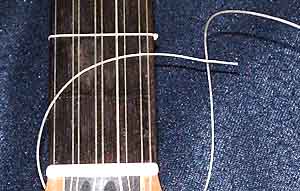 Start with the instrument on a flat soft surface with the neck towards you, the body away from you.
To tie the fret, thread a length of new gut under the strings from treble to bass.
Bring the rest of the gut under the neck to the bass side. Let the end that emerges from
under the strings be called the 'short end'.
The rest of the gut is the 'long end'.
Start with the instrument on a flat soft surface with the neck towards you, the body away from you.
To tie the fret, thread a length of new gut under the strings from treble to bass.
Bring the rest of the gut under the neck to the bass side. Let the end that emerges from
under the strings be called the 'short end'.
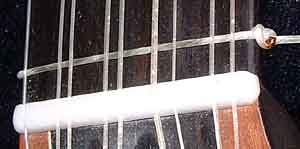
The rest of the gut is the 'long end'.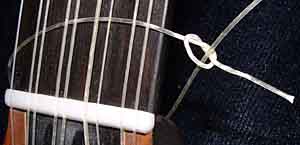 Tie the knot, a simple 'granny', with the short end, around the long end. If you start by having
the short end further down the neck than the long end and pass the short end under the long end
towards yourself, you should find that the knot, when tightened, will lie flattish against the
corner of the fingerboard.
Tie the knot, a simple 'granny', with the short end, around the long end. If you start by having
the short end further down the neck than the long end and pass the short end under the long end
towards yourself, you should find that the knot, when tightened, will lie flattish against the
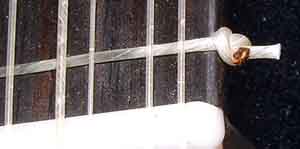
corner of the fingerboard.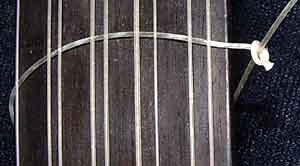 Using pliers, tighten the knot as tight as you can get it, then using clippers cut of the short
end to leave about 2-3mm beyond the knot.
Using pliers, tighten the knot as tight as you can get it, then using clippers cut of the short
end to leave about 2-3mm beyond the knot.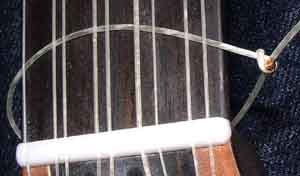 Using your lighter, bring the flame, carefully, just close enough to the short to singe it
until a small blob forms close up to the knot. Be sure not to burn your strings, hands or anything
else other that the fret gut. Some people prefer to use a small electric soldering iron
for this.
Using your lighter, bring the flame, carefully, just close enough to the short to singe it
until a small blob forms close up to the knot. Be sure not to burn your strings, hands or anything
else other that the fret gut. Some people prefer to use a small electric soldering iron
for this. Please Note when pulling the fret tight it sometimes happens, especially with the thinner gut sizes, that the knot can pull through suddenly causing a big jolt. It is therefore important not to have anything hard or sharp in the way that could damage you or your instrument if this happens.
 Now tighten the fret by pulling the long end, use the pliers if there is not enough to get hold of.
If the knot was tight enough and the blob formed correctly, you should find that the fret kind of
'locks' as it gets tight. With thicker frets, you need to get the fret as tight as you can at
the narrowest part of the neck that is available. If it is the first fret,
this will be just beyond the nut, otherwise just in front of the previous fret.
With thinner frets (less than 0.6mm) there is much more elasticity so you will not need
to put in so much force to get them tight.
Now tighten the fret by pulling the long end, use the pliers if there is not enough to get hold of.
If the knot was tight enough and the blob formed correctly, you should find that the fret kind of
'locks' as it gets tight. With thicker frets, you need to get the fret as tight as you can at
the narrowest part of the neck that is available. If it is the first fret,
this will be just beyond the nut, otherwise just in front of the previous fret.
With thinner frets (less than 0.6mm) there is much more elasticity so you will not need
to put in so much force to get them tight.
 Trim back the long end to leave 2-3mm as with the short end.
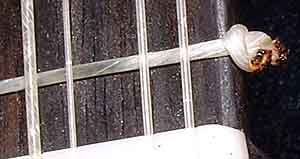 Burn this free end back as before and slide the fret up the neck into its right position.
If you have got the fret tight enough this should be quite difficult. Remember
that over time the gut will stretch and loosen, so the tighter the better when they are new.
Burn this free end back as before and slide the fret up the neck into its right position.
If you have got the fret tight enough this should be quite difficult. Remember
that over time the gut will stretch and loosen, so the tighter the better when they are new.